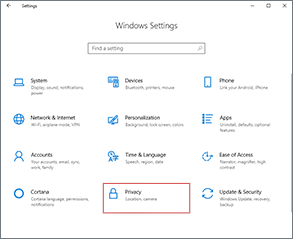
With Windows 10 version 1803 (April 2018 update), Microsoft changed the behavior of camera app access setting so that it affects desktop applications as well.
To fix this do the following:
1. Go to Windows settings and select Privacy.
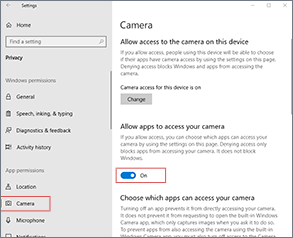
2. Select Camera and switch on the “Allow apps to access your camera” toggle.
3. Restart those applications where you’ve wanted to use the camera/webcam.
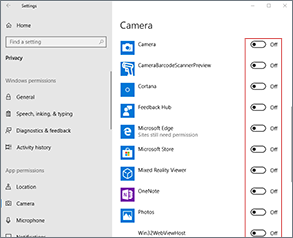
4. (Optional) To block apps access to camera you will have to toggle camera off for each app. You will have to do this after each new app you install.
Guide to achieve best audio quality, performance and functionality for Realtek onboard audio cards.
Exact placement and availability of the settings could vary depending on Windows version and Realtek HD Audio Manager version and vendor customization.
In sound card application settings (Realtek HD Audio Manager):
Speakers and headphones settings:
Under Speaker Configuration select the number of speakers that you have. For a 5.1 audio system select 5.1 Speaker. For a 2.1 audio system select Stereo . Selecting more channels than the number of speakers you have connected won’t enable you to hear more sounds or hear the footsteps and positioning of enemies better in games.
Set playback Default Format to 24Bits, 44100 Hz this is generally good for most media (games, movies, music), while video DVDs use 48 kHz. Increasing Sample Rate without having a source that’s sampled at a higher rate won’t improve sound quality, in fact it will degrade it. Having the bit-depth set to 24 bit will slightly improve audio quality. You can find detailed information on audio bit-depth here.
Microphone and Line In settings:
Set Microphone and/or Line In Default Format to 24Bits, 44100 Hz. The 44.1 kHz (44100 Hz) sample rate is the one used by most media (games, movies, music), while video DVDs use 48 kHz. Having the bit-depth set to 24 bit will slightly improve the recording audio quality.
If you are using speakers and want to reduce speaker output from being picked up by the microphone then enable Acoustic Echo Cancellation option that’s under Microphone Effects.
General settings:
Be careful which settings or effects you enable. The sound effects will slightly increase the DPC latency, which in turn could cause other problems like audio/video desynchronization or slow network/internet speed. You can read more on the impact of sound effects to DPC latency here. They sound effects also change the sound not always in a good way, you might like it for your music but it might harm the audio positioning in games.
In Windows:
Windows 10: If you wish to emulate 8 channels surround on a 2 channel headphones/speakers you need to go to Windows Volume->Sounds->Speakers proprieties and enable “Windows Sonic for Headphones” or “Dolby Atmos for Headphones” and tick the “7.1 virtual surround sound shifter” checkbox after setting the number of channels to 8 and analog output to “Headphones”. Warning: This setting will change playback audio bit depth to 16bit and sample rate to 44100 Hz.
Windows XP: Don’t increase the Windows Audio Volume to 100%, instead set it to 80-90% max in order to decrease the effects of dynamic volume issue. Issue regarding setting volume to 100% is detailed here.
In audio/video applications:
Enable the audio output/playback to 32bit or 24bit instead of 16bit, as this will slightly improve audio quality. This setting is application specific so you will have to search for it in application preferences/options. For example, in Winamp the setting is located in Preferences->Playback->Allow 24bit. If you have Windows Vista/7/8/10 then you have to enable 24 bit output in Windows Sound settings or Realtek HD Audio Manager as well.
Windows Vista/7/8/10: Set each application volume at 80-90% in order to avoid dynamic volume issue. Issue regarding setting volume to 100% is detailed here.
In games options:
Set Sound Quality to Medium or High depending on the importance of sound quality in that particular game. This setting affects CPU usage so if you have a slow CPU you should select Medium and if you have a fast CPU you can go with High. Setting this to High with a slow CPU might cause to much strain on your CPU and this in turn will affect the FPS of that particular game.
Set the number of speakers you currently have connected is properly detected.
Windows 10: If you’ve previously enabled “Windows Sonic for Headphones” or “Dolby Atmos for Headphones” and “7.1 Virtual surround speaker sound” options in Windows settings then set the in game number of speakers to 7.1. The game needs to generate 7.1 sounds which will be processed and converted for 2 channels output.
Some AMD AM4 motherboards (Ryzen CPUs) have some compatibility issues with ASUS Xonar sound cards. These issues will manifest as system rebooting or showing a BSOD when installing Xonar drivers or when changing various Xonar settings such as switching from speakers to front panel headphones. Below you have a list that I’ve compiled with user reported compatibility status of their Xonar card and AM4 motherboard. The list will be periodically updated.
Boards that are listed as having compatibility issues with specific Xonar sound cards may also have issues with other PCI/PCIe cards like other sound cards, network cards, RAID cards, etc.
Note that the compatibility status may vary depending on BIOS version, it may vary depending on which Xonar card do you have, if it’s a PCIe or PCI card, it may be affected by whether the Xonar card was plugged in a PCIe slot that is connected to the chipset or one that is connected to the CPU (1st and 2nd x16 slots on X370, X470, X570 motherboards). Particularly affected by these compatibility issues seem to be the Xonar Essence STX II cards, which have an ASMedia PCI-to-PCIe bridge instead of the PLX PCI-to-PCIe bridge that the rest of PCIe Xonar cards have. So a motherboard on which the STX II card has problems, might actually work for different Xonar card. Xonar D2X might be another card that’s particularly affected, waiting for more reports to confirm this.
Page updates
29 Sep 2019: Added D2X with ASUS ROG STRIX x570-E Gaming.
28 Sep 2019: Added STX II with ASUS Prime X570-P.
26 Sep 2019: Added D2X with ASUS PRIME X570-P.
21 Sep 2019: Added D2X with Gigabyte X470 AORUS ULTRA GAMING and STX with ASUS ROG Strix X470 F Gaming entries.
17 Sep 2019: Added STX with ASUS ROG Strix X570-F Gaming entry.
11 Sep 2019: Updated intro and “Other info” sections. Added STX with MSI B350 and D2X with ASRock Fatal1ty X470 Gaming K4 entries. Updated “Possible solutions” with another possible solution (no. 3).
02 Sep 2019: Updated table with Gigabyte X570 Aorus Master and ASUS X570 ROG Crosshair VIII Hero. Updated “Possible solutions” with another possible solution (no. 6).
25 Aug 2019: Updated table with additional entries from ASUS ROG forum.
List will be periodically updated. If you have a Xonar PCI/PCIe card and a AMD Ryzen AM4 motherboard leave a comment below with the compatibility status.
[3] works with solution 3 from possible solutions section
[4] works with solution 4 from possible solutions section
Possible solutions
Here are some things you could do that could fix or workaround the compatibility issues:
1. Update the motherboard BIOS to the latest version.
2. If you’re using the Windows installation from your previous system, do a clean Windows install.
3. Try switching the PCIe connection where the Xonar card is plugged from Gen 3/4 to Gen 1 in BIOS. This method has been described in detail here by b1tmaster0 for his ASRock Fatal1ty X470 Gaming K4. Such an option is not available for all the motherboards. Some info and other ways to do this:
Location and name of the settings is board specific. For ASRock it may be under “Advanced\AMD PBS\” and may be only listed as “M.2 PCIe Switch”. For MSI it may be under “Settings\Advanced\PCI Subsystem Settings\PCI_E* – Max Link Speed”.
For his ASRock Fatal1ty X470 Gaming K4, b1tmaster0 changed the “M.2 PCIe Switch” connection speed, which was for his M2 slot that was also shared with the PCIe slot where the Xonar card was placed. You can check which M2 and PCIe slots share the same connection by consulting the motherboard manual.
You can figure in the name/number of the PCIe slot the card is placed in by going to (MSI) “Board Explorer” or (Gigabyte) “System Information\Plug in Devices Info”.
“PCIe x16 Switch” or similar named options are for setting the connection speed of the first x16 slot and it’s where you usually have the GPU. If you have a X370, X470 or x570 motherboard which has a second PCIe x16 length slot that is directly connected to the CPU, you could place the Xonar card in the 2nd x16 length slot, enable the slot by setting “PCIe x16/2×8 Switch” or similar to “2×8” and change “PCIe x16 Switch” to “Gen 1”. If it works your could also try with the speedier Gen 2. Your GPU may run a bit slower, see benchmarks here and here, which depending on your computer use case and GPU may or may not be important.
“Promontory PCIe Switch” or similar named options are for controlling the connection link between the chipset and CPU. If you don’t have the option to set the connection speed for a specific PCIe slot you could try setting this to Gen 1 and if it works your could also try with the speedier Gen 2. This may limit the speed of the devices connected to the chipset (NVME M2/PCIe SSD), USB3.x flash drives, other PCIe cards.
4. Move the card to a different PCIe slot, try one that is connected directly to the CPU which are the 1st and 2nd x16 length slots on X370, X470, X570 motherboards. The 2nd x16 length slot needs to be enabled in BIOS, see the description on (3) “PCIe x16 Switch”.
5. Install UNi Xonar v1.71.1 driver as it might reduce the frequency of these issues.
6. Unlikely: Avoid IRQ sharing between Xonar card and other devices. To do so you could try switching the other devices interrupts from Line-based to MSI, see info here. Do not switch the Xonar card to MSI as it will prevent your system from booting. You can try this in conjunction with moving the card to a PCIe in which the Xonar card IRQ is shared with less devices.
Please leave feedback in the comment section below if one of these methods worked for you.
Other info & ASUS’s response
Threads discussing these issues on ASUS ROG forums here and here.
ASUS official FAQ response about these issues here and here. The statement from ASUS that the cards (at least STXII and D2X) are not compatible is, at the very least, inaccurate. Furthermore, you would think that making both the Xonar sound cards and their own AMD Ryzen AM4 motherboards, most of which are affected by these compatibility issues, would make it much easier for ASUS to find the problem. Speaks volumes of how “great” their support is. To make matters even worse, after concluding that the cards are not compatible, they closed the main forum thread discussing this issue, thus roadblocking any community driven investigation for a possible solution.
On the topic of ASUS motherboards compatibility with soundcards, it’s worth noting that you may run into issues with Creative cards as well (#1). It’s unclear at the moment if you will have the same problem with other motherboard brands or this problem affects mostly ASUS X570 boards.
To show devices by IRQ in Windows XP, Windows Vista, Windows 7, Windows 8, Windows 8.1, Windows 10, Windows Server 2008, Windows Server 2012 and Windows Server 2016, do the following:
Launch Device Manger (in Windows Run or Search type devmgmt.msc or right click on Computer->select Manage->select Device Manager)
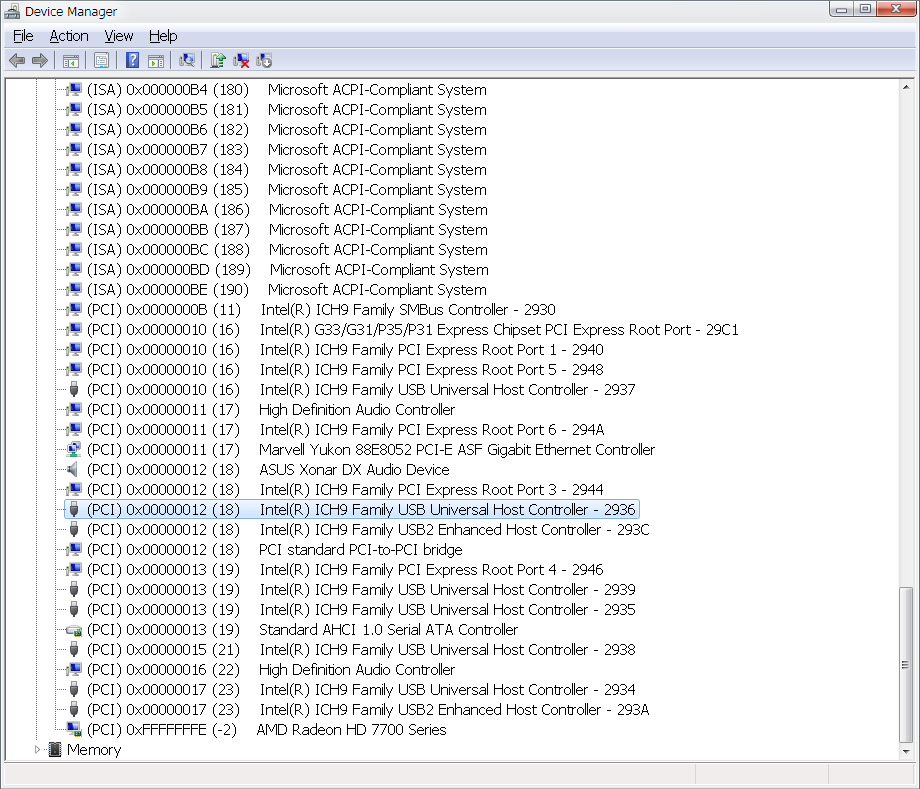
In the menu select View -> Resources by connection
Expand Interrupt by request (IRQ) item category and scroll down to items starting with (PCI)
Additional info
Devices that share the same IRQ with other devices are recognized by having the same (PCI) value. Devices that have positive (PCI) values are working in Line-based interrupts mode. Those that have negative (PCI) values are working in MSI (Message signaled interrupts) mode.
IRQ are automatically allocated by the motherboard BIOS. Ideally, latency sensitive or I/O devices like sound cards, network cards, storage (SATA, NVME, SCSI) drive controllers should have their own IRQ. Having two or tree such devices on the same IRQ could impact the performance or functionality of those devices.
Avoid IRQ sharing by changing the interrupt mode to MSI
In order to avoid IRQ sharing between devices, you could change the interrupt mode to MSI for some of those devices with MSI Utility.
Some notes on changing the interrupt request to MSI:
Be advised that not all devices will work in MSI mode and some, if changed, may prevent Windows from booting. Some of these devices are listed in the table below.
Before using the MSI Utility, update the drivers as some newer drivers might switch to MSI by default. Try searching for them on the original chip manufacturer and not on the motherboard manufacturers page.
You can disable those devices that are not used (for example LAN, onboard audio card, Bluetooth etc.) via BIOS or Device Manager (in Windows Run or Search type devmgmt.msc or right click on Computer->select Manage->select Device Manager)
For devices you don’t know they work after changing interrupt mode to MSI, change one device at a time after which restart the system so that if your Windows does not boot anymore you know which device was the problem.
If Windows does not boot anymore:
Windows 7: When the system starts, tap F8 until the Windows boot menu appears and select the “Last Known Good Configuration” option.
Windows 8/10: When the system starts, tap F8 until the Windows boot menu appears, select “safe mode”, launch MSI Utility and revert the latest change you made. If “safe mode” does not work, in the boot menu press F10-> F1-> Troubleshoot-> Advanced Options-> System Restore-> pick the most recent restore point.
Will work but the device will not be stable when it is intensively in use and the will lose the connection
Realtek PCIe GBE Family Controller
Yes
AMD SATA storage controller
No
Only if it is switched by the drivers themselves
Intel AHCI and RAID storage controller
No
Older drivers probably won’t work. Newer drivers of Intel Rapid Storage v11.7 and above enable it by default
Standard AHCI 1.0 Serial ATA Controller
No
NVIDIA GeForce & Quadro display adapters
Yes
With newer drivers might be switched by default. On older drivers you can manually switch it
Intel(R) ***** Familiy PCI Express Root
Yes
Intel(R) ***** Express Chipset PCI Express Root Port *
Yes
Intel(R) Management Engine Interface
Yes
Intel(R) USB 3.0 eXtensible Host Controller
Yes
Intel(R) ***** SMBus Controller
No
Intel(R) ***** Family USB Universal Host Controller
No
Intel(R) ***** Family USB2 Enhanced Host Controller
No
PCI standard PCI-to-PCI bridge
Yes
* = any.
List will be periodically updated. Some of these could work with newer drivers.
Applies to the following OS:
Windows XP, Windows Vista, Windows 7, Windows 8, Windows 8.1, Windows 10, Windows Server 2008, Windows Server 2012, Windows Server 2016, Windows Server 2019
Here are some possible fixes for sounds echos that are heard during the audio playback of music, movies and video games. These type of echos are clearly audible for example when playing and pausing a song despite not having any fade out effects enabled in the audio player.
Disable “Listen to this device” and Microphone and “Line In” Monitoring
“Listen to this device” and Monitoring options are used to play in real time through speakers or headphones the sounds that are captured by Microphone, Line In, Stereo Mix or Wave recording devices. By default, neither “Listen to this device” nor Monitoring options are enabled. They could have been enabled by the user’s intervention, an application or because of a Windows bug.
How to disable:
Right-click on Windows Volume tray icon-> Sounds -> go to Recording tab.
For each device (Microphone, Line In, Aux, Stereo Mix, Wave etc.) go to its proprieties by double-clicking on it, then:
2.1. Go to Listen tab and uncheck “Listen to this device” if it is checked.
2.2. For Microphone and Line In proprieties, also look for an option called Monitoring and uncheck if it is checked. For Xonar cards it appears under Custom tab. For some cards this may only appear in sound card control panel application.
About Stereo Mix and Wave
Stereo Mix recording device is used to capture internal sounds (music players, video players, browsers, games) along with those from the microphone and line in inputs. Recording volume is dependent on Windows playback volume. It it always on. If you unplug or disable the Microphone and Line In, you can use Stereo Mix to record a live stream of a show or concert for example.
Wave recording device is used to capture internal sounds (music players, video players, browsers, games). Recording volume is dependent on Windows playback volume. It is always on. You would use Wave recording device to audio record a live stream of a show or concert for example.
Having “Listen to this device” on either Wave or “Stereo Mix” would basically cause the same sound to be played again after a slight time delay.
Other causes for sound echos
If you have a multichannel speakers system (4.0, 5.1, 7.1) some sound card drivers may have a delay on rear, side and center speakers sounds and this would cause the sound to be perceived as having an echo. In this case, check the sound card settings panel if it allows to change those delays to 0. For the Xonar cards you need to install UNi Xonar drivers to fix this.
Sound effects or environment effects are enabled in the sound card settings panel or audio player.
If the echo is heard only in a specific application then the problem is with that application and you’ll have to check it’s settings if there is an option to turn it off. Look at DSP (Digital Sound Processing) options, at sound effects or environment effects options, at the different plugins that might be enabled.
Applies to the following OS:
Windows Vista, Windows 7, Windows 8, Windows 8.1, Windows 10, Windows Server 2008, Windows Server 2012, Windows Server 2016, Windows Server 2019
Here are a couple of solutions to troubleshoot and fix microphone problems in Windows. This guide will be updated if other possible solutions are discovered.
History
02April2020: Article published.
1. If you are on Windows 10, check first that microphone is allowed to be accessed by applications
Open Windows Explorer and in the address field copy-paste: Control Panel\All Control Panel Items\Troubleshooting\
Under "Hardware and Sound" press "Troubleshoot audio recording".
If presented with a list of devices, select the device you want to troubleshoot. Most likely Microphone(your audio card). If you are using a webcam with microphone then that's what you need to select.
Select "Apply this fix" for the presented solutions.
3. Verify that Microphone recording device is the default recording device in Windows
Open Windows Sound settings (right-click on Windows Volume tray icon-> Sounds or if missing type in Windows search: "change system sounds", also see other how to methods)
Go to Recording tab.
Select the Microphone device corresponding to the device or audio card that's connected to and press "Set default" button if it's available. If you are using a webcam with microphone then that's what you need to select and set as default.
4. Verify if you microphone works in other applications
You can check if microphone works in Windows default recording application:
Windows Vista/7/8: in Windows Search or after pressing Win+R type: soundrecorder
Windows 10: in Taskbar or Start Menu Search type: sound recorder app. If you don't have this installed you need to get this from Microsoft Store. Probably a better option would be to get ocenaudio recording application and check microphone with it.
If microphone works in the previous step, open that specific application that does not work, go to it's settings/preferences and check that under Input/Recording/Microphone device the "System Default", "Default communication device" or Microphone (your audio card / webcam) is selected.
A couple of examples where these settings are in different applications:
For Discord: User Settings-> Voice & Video.
For Steam: Friends List window-> Gear icon->Voice->"Voice input device".
For Skype: Settings-> Audio & Video -> Microphone.
5. Check if microphone is faulty
If you have an external microphone, check it in another PC or try with a different microphone on your current PC. On that other PC you may also need to do the solutions presented above.
If you are on a notebook and you have a integrated microphone, try with an external microphone.
Applies to the following OS:
Windows Vista, Windows 7, Windows 8, Windows 8.1, Windows 10, Windows Server 2008, Windows Server 2012, Windows Server 2016, Windows Server 2019
Page about the the loud white/static noise or screech issue on Xonar cards that some experience.
Page updates
16 May 2020: Possible solution 1 updated.
11 May 2020: Page updated.
10 May 2020: Article published.
Why it happens
I personally only had such an issue only 1 time in over 10 years on my old PC, a Intel Core 2 Duo with DFI P35 motherboard, AMD Radeon HD7790, Xonar DX and Windows 7. At that moment my PC was under heavy load and I jumped to a different position on a YouTube video. Most of the reports involve playing a video on YouTube or another video site or in a video desktop application. Currently, I'm thinking it has to do with some sort of big delay in processing the sound which causes the driver to go haywire. Could be related to very high DPC latency or something else.
Some reported having this issue only after updating to Windows 10, never had this on Windows 7.
Other discussions outside this page that have been taken place about this subject #1(head-fi.org), #2, #3, #4.
Possible solutions
1. Disable all of Xonar's recording inputs and use the Microphone or Line In from the onboard audio card or buy a USB microphone
To do so, open Windows Sound (right-click on Windows Volume tray icon-> Sounds or if missing type in Windows search: “change system sounds”)-> Select Recording tab-> Right-click and select Disable for: Microphone (ASUS Xonar...), Line In (ASUS X...), ALT (ASUS X...), AUX (ASUS X...), Stereo Mix(ASUS X...) and Wave (ASUS X...). Then right-click on Microphone (HD Audio.../Realtek.../SupremeFX.../USB Mic...) and select "Set as Default" and "Set as Default Communication Device".
Thanks to Louis for sharing this solution, you can read more about this here. Here is another report that might indicate some of these cases might have something to do with the microphone input.
2. Lower your system DPC latency
Install UNi Xonar drivers with Low DPC Latency or C-Media Panel configuration. Optionally, use XonarSwitch to control the sound card settings. Do not use ASUS Audio Center.
Do not enable any sound enhancements in ASUS/C-Media/XonarSwitch panel.
Check this article for other tips to reduce DPC Latency.
3. Avoid IRQ sharing between Xonar card and other devices
To do so you could try switching the other devices interrupts from Line-based to MSI, see info here. Do not switch the Xonar card to MSI as it will prevent your system from booting. You can try this in conjunction with moving the card to a PCI/PCIe in which the Xonar card IRQ is shared with less devices.
Please leave feedback in the comment section below if one of these methods worked for you. Mention your sound card, motherboard, video card, and OS.
General recommendations and what else can you do
As a precautionary measure, you should set the volume in Windows and applications close to 100% and control the volume from the amplifier, speakers or headphones. If you are using headphones that do not have a volume control, you should buy a headphone amplifier so that you can control the volume.
Keep in mind that nothing is worth permanently damaging your ears.
When the issue happens you can try the Xonar Driver Restart instead of restarting the PC.
---
My old answer from the UNi Xonar FAQ page:
Occasionally, I get a loud white/static noise or screech. Why is that and is there something that can be done to prevent this?
There are at least two instances:
It may be a issue or incompatibility between the motherboard and the Xonar audio card. Ironically, ASUS motherboards seem to be most prone to this issue. Unfortunately there isn't much it can be done. You should look into updating the motherboard BIOS to the latest version. If that does not solve the problem a possible solution would be to change the motherboard if you think the card you own is worth it.
A Windows 10 only issue. Discussions for this case are talking place on this page. No solution has been found so far except reverting back to Windows 7 or Windows 8.1.
General recommendations: If you run into this issues and have not found a solution you should either buy a different audio card that's not powered by C-Media audio chips (so no ASUS or HTOmega), buy an external DAC or at least take some precautionary measures like controlling the volume with a amplifier while having Windows volume always set to 100%. Keep in mind that nothing is worth permanently damaging your ears.
1. How to uninstall a recent driver update delivered through Windows Update
Open Device Manager (press Win+R or search and copy-paste: devmgmt.msc or right-click on This PC/Computer icon -> select Manage-> select Device Manager)
Navigate to the device you want to and double click on it.
In the opened Proprieties window, select Driver tab, click on "Roll Back Driver" button if it's enabled.
Follow on with the wizard and restart when promoted.
Applies to Windows Vista, Windows 7, Windows 8, Windows 8.1, Windows 10, Windows Server 2008, Windows Server 2012, Windows Server 2016, Windows Server 2019.
2. Block specific Windows drivers from installing
Uninstalled or pending drivers can be blocked from installation following these steps:
Run wushowhide.diagcab, click Next, chose "Hide updates", chose the update or driver you want to block.
In order to block an already installed update you need to first uninstall it as per the guide above.
To unblock a previously blocked update:
Run wushowhide.diagcab, click Next, chose "Show hidden updates", chose the update or driver you want to allow.
Applies to Windows 10, Windows Server 2016, Windows Server 2019.
3. Disable all automatic Windows driver updates from installing
To disable Windows automatic drivers from ever installing, download and run disable_driver_update_Windows_v1.0.bat. Now Windows will not automatically updates drivers anymore. Just keep in mind to re-enable this option if you want to update a driver for a device with drivers from Microsoft Windows driver catalog. To re-enable, download and run enable_driver_update_Windows_v1.0.bat.
Alternatively, you can disable automatic installation of Windows 10 updates and drivers and choose which ones to install following this guide.
Applies to Windows 10, Windows Server 2016, Windows Server 2019.
Type in Windows search: Programs and Features or open paste the following in the Windows Explorer address field: Control Panel\All Control Panel Items\Programs and Features.
On the left pane click on View installed updates.
(Optional) Enable "Installed On" column and sort updates after the "Installed On" date so that the recent ones are easier to find.
Select a specific update you want to uninstall and click Uninstall.
If you don't wish to uninstall any other updates, restart when promoted.
To prevent those uninstalled updates from installing again check "Block specific Windows updates and drivers from installing" below.
Applies to Windows Vista, Windows 7, Windows 8, Windows 8.1, Windows 10, Windows Server 2008, Windows Server 2012, Windows Server 2016, Windows Server 2019.
2. Block specific Windows updates and drivers from installing
Uninstalled and pending updates and drivers can be blocked from installation following these steps:
Run wushowhide.diagcab, click Next, chose "Hide updates", chose the update or driver you want to block.
In order to block an already installed update you need to first uninstall it as per the guide above. For drivers installed through Windows update, see this guide on how to roll them back before hiding them.
To unblock a previously blocked update:
Run wushowhide.diagcab, click Next, chose "Show hidden updates", chose the update or driver you want to allow.
Applies to Windows 10, Windows Server 2016, Windows Server 2019.
3. Disable automatic installation of Windows 10 updates and drivers and instead choose which updates to install
To take control of which Windows updates and drivers are installed and when do the following:
Select "Disable the built-in Windows Automatic Updates and use only WAU Manager"
(Optional) Select "Create a Desktop shortcut to quickly update..." and/or schedule when the program should search for Windows updates and notify you if you wish to install them.
Press "Save and Apply". To search and chose which updates to install press on "Update Windows Now".
! Note that Windows 10 will automatically start installing updates again if you go to Windows Settings->Update & Security-> and you press the "Check for updates" button. There might also be other situations where Windows might automatically update without your intervention, so if you want to make sure Windows updates are not applied without your permission check "Disable Windows Update completely" below and only enable the Windows Update service when you want to install Windows updates.
Applies to Windows 10, Windows Server 2016, Windows Server 2019.
4. Disable Windows Update completely
If you wish to permanently or temporarily block any currently pending and future Windows updates and drivers updates you can use Windows Update Blocker program. Unfortunately this will also prevent Microsoft Store apps downloads and updates from installing, so keep that in mind in case you need that at some point. Disabling Windows Update completely would be useful for benchmarking purposes or if you want to make sure that Windows updates are not applied without your intervention.
If you still want to receive security patches for Windows you can use 0patch software. 0patch approach to patching security issues is innovative as it does not require system restarts, patches can be individually turned on/off, it includes patches for other software applications and they are much faster at patching security issues than Microsoft with their Windows and Office updates. Note that the FREE version has limited patching capability/functionality as described here.
Applies to Windows Vista, Windows 7, Windows 8, Windows 8.1, Windows 10, Windows Server 2008, Windows Server 2012, Windows Server 2016, Windows Server 2019.
Here are a couple of solutions to troubleshoot and fix camera problems for PCs with Windows. This guide will be updated if other possible solutions are discovered.
History
12May2020: Article published.
1. If you are on Windows 10, check first that camera is allowed to be accessed by applications
2. Verify if you camera works in other applications
Test it webcamtest.com website. Also try with a different web browser. If you receive an error like: "It seems your web camera streams video as a static image. Either the webcam hangs, or as a video source, it uses regular image." you should roll back the drivers(see section 4.1-4.3) or install different drivers (see section 5).
On Windows 10 you can also test it with the built in camera app, go to Taskbar or Start Menu Search and type: camera
If camera works in the previous steps, open that specific application that does not work, go to it's settings/preferences and check that under Camera/Video device the proper camera device is selected.
A couple of examples where these settings are in different applications:
For Discord: User Settings > Voice & Video.
For Skype: Settings > Audio & Video > Camera.
For Microsoft Teams: Click your profile picture at the top of Teams and go to Settings > Devices > Camera.
3. Verify that the camera is not turned off
Some cameras have a hardware button to turn them on or off. Some notebooks might have a keyboard button or key combination (FN + one of the F buttons) to turn on/off the camera. For some notebooks such an option could be found in BIOS.
4. Check if camera drivers are properly installed
Open Device Manager (press Win+R or search and copy-paste: devmgmt.msc or right-click on This PC/Computer icon > select Manage > select Device Manager)
Camera devices if have a proper driver are placed under Cameras or Imaging devices categories. Expand these categories.
If you have a device there, double click on it and check if under "Device status" if it's stated "Device is working properly".
Try first to revert to the previous driver version. In the opened Proprieties window, select Driver tab, click on "Roll Back Driver" button if it's enabled. Test the camera again (close and reopen the test application each time you try). If it works and you are on Windows 10, you should probably prevent Windows Update from updating the drivers, as at some point it could load the buggy drivers again. Check this guide on how to do this.
If you have multiple devices under Cameras or Imaging devices categories, it's possible that some other device or a different camera sensor is being considered as default. You could try to disable all other devices but one at a time (with right click -> Disable) and retest the camera in an application (close and reopen it each time you try), you can keep the Device Manager window open.
5. Install a different driver.
Look for drivers on the manufacturer website. If you have a notebook with a integrated camera search for your notebook's drivers on the manufacturer's website (eg. Dell, HP, Acer, ASUS).
Most drivers have a automated installer. Others may require you to manually install the driver through Device Manager:
Launch Device Manager (press Win+R or search and copy-paste: devmgmt.msc or right-click on This PC/Computer icon > select Manage > select Device Manager)
If your camera already has drivers installed, look under Cameras or Imaging devices categories for the camera and If it does not, it will show up as a "Unknown device" or similar and has a yellow icon with an exclamation mark.
Double click on it.
Go to Driver tab and and click on Update Driver...
Choose "Browse my computer for driver software" and in the next screen select Browse.
Within the browse window navigate to the folder where you have extracted the driver files from the downloaded archive click OK.
Click Next, and wait for the confirmation that the drivers installed correctly.
If you are on Windows 10, you should prevent Windows Update from updating the drivers, as at some point it could load the buggy drivers again. Check this guide on how to do this.
6. Check if camera is faulty
If you have an external camera, check it in another PC or try with a different camera on your current PC. On that other PC you may also need to do the solutions presented above.
If you are on a notebook with a integrated camera, try connecting an external camera. You will have to disable the integrated camera per instructions in section 4.4.
As different external camera you could use your phone camera with your PC. For example see this guide for android phones.
Applies to the following OS:
Windows Vista, Windows 7, Windows 8, Windows 8.1, Windows 10, Windows Server 2008, Windows Server 2012, Windows Server 2016, Windows Server 2019
A couple of ways to enable stereo upmix from 2.0 sounds to 4.0, 5.1 or 7.1 speakers configurations.
Contents
Through Equalizer APO
Through players settings
For Xonar cards through the drivers
Page updates and announcements:
1. Through Equalizer APO
1. In the card's audio panel set your number of speakers and number of channels. For example, if you have 5.1 speakers, set audio channels to 6 and analog output to 5.1 speakers. Some cards may be not have the option to set the number of audio channels.
5. Click “Edit text” button on the newly created filter, delete the text and copy-paste the code for your desired configuration:
a. Config for 5.1 speakers and upmixing only 2.0 sounds, copy-paste: Stage: pre-mix
# do upmixing
If: inputChannelCount == 2
Copy: MIX=0.5*L+0.5*R C=MIX SUB=MIX SL=L SR=R
EndIf:
b. Config for 7.1 speakers and upmixing only 2.0 sounds, copy-paste: Stage: pre-mix
# do upmixing
If: inputChannelCount == 2
Copy: MIX=0.5*L+0.5*R C=MIX RC=MIX SUB=MIX SL=L SR=R RL=L RR=R
EndIf:
c. Config for 5.1 speakers and always upmix sounds, copy-paste: Copy: MIX=0.5*L+0.5*R C=MIX SUB=MIX SL=L SR=R
d. Config for 7.1 speakers and always upmix sounds, copy-paste: Copy: MIX=0.5*L+0.5*R C=MIX RC=MIX SUB=MIX RL=L RR=R SL=L SR=R
This config was taken from here.
e. Config for 5.1 or 7.1 speakers, where the subwoffer is standalone and you want to upmix only 2.0 sounds, copy-paste: Stage: pre-mix
If: inputChannelCount == 2
# copy to subwoofer a mix from front left and right channels
Copy: SUB=0.5*L+0.5*R
EndIf:
Stage: post-mix
# (optional) remove # from Copy if you want to redirect center channel to front left and right and mute center
#Copy: L=L+0.5*C R=R+0.5*C C=0.0
6. Press Enter once your done.
7. If you want the upmix to work for Chromium based browsers (Chrome, Edge, Opera, Cent Browser, Vivaldi etc.) you will need to edit their shortcuts (Right-click->Proprieties) and add at the end of the Target path field --try-supported-channel-layouts and relaunch the browser. Alternatively, some chromium based browsers (but not Chrome), may have a option in their settings for startup parameters. For example, in Cent Browser you can add the parameter in Settings-> "Startup command line".
You can read about these EqualizerAPO paramenters and for which speakers they correspond here.
2. Through players settings
If you want to enable stereo upmix on a case by case basis through your Audio/Video player settings. In this case, as far as sound card configuration, in it's audio panel you need to set your number of speakers and and the same number of channels. For example, if you have 5.1 speakers, set audio channels to 6 and analog output to 5.1 speakers. Some cards may be not have the option to set the number of audio channels.
Player settings configuration examples:
AIMP: In Options->Playback-> in Parameters field select "5.1 Surround" is you have 5.1 speakers.
Some players need a dedicated plugin in order to do this:
foobar2000: Download Channel Mixer plugin and load it in foobar2000. In foobar2000-> Preferences->Playback->DSP Manager-> double click Channel Mixer so it's on Active DPSs side -> select it and press Configure selected-> set the number of channels to 6, go to Subwoofer tab and enable "Use subwoofer".
This method will not work for web browsers and YouTube or other media sites unless there is a way to enable the stereo upmix either through browser configuration or a browser extension.
3. For ASUS Xonar cards through the drivers
Guide for ASUS Xonar cards that are supported by UNi Xonar drivers.
Windows Vista/7/8/10 guide:
Install the UNi Xonar driver with "Re-enable stereo upmix to 4, 5.1 and 7.1" option set in the installer.
In Asus/Cmedia audio panel set the audio channels to 2 and analog output to 5.1 speakers. Caution: it won't work if you set audio channels to 6 and analog out to 5.1. By using these settings your Windows and other applications will output the sound from 2.0 format to 5.1 speakers and not 5.1 format to 5.1 speakers.
[or]
In Asus/Cmedia audio panel enable "Dolby Pro Logic IIx", set the audio channels to 2 and analog output to 5.1 speakers. You can tune the "Dolby Pro Logic IIx" parameters to maximize volume on the rear and center channels. Caution: it won't work if you set audio channels to 6 and analog out to 5.1. By using this settings your Windows and other applications will output the sound from 2.0 format to 5.1 speakers and not 5.1 format to 5.1 speakers
Windows XP guide:
Install the UNi Xonar driver with "Re-enable stereo upmix to 4, 5.1 and 7.1" option set in the installer.
In Asus/Cmedia audio panel set the output to 6 or 8 channels .
Caution: Enabling GX in order to have a working stereo upmix in Win Vista/7/8/10 is not recommend because of the crashes and issues that arise because of GX (see Q&A 11).
Applies to the following OS:
Windows Vista, Windows 7, Windows 8, Windows 8.1, Windows 10, Windows Server 2008, Windows Server 2012, Windows Server 2016, Windows Server 2019
Useful for applications like:
Aimp, foobar2000, Winamp, Edge, Chrome, Firefox, Opera etc.
This article is a work in progress and can have major modifications and additions.
The following information should work for B350, B450, X370, X470 and X570 chipsets along with 1st gen, 2nd gen and 3rd gen Ryzen CPUs. While 1st and 2nd gen Ryzen CPUs and motherboard with chipsets up to X470 work with official AMD drivers, the 3rd gen AMD Ryzen CPUs and X570 chipsets don't have official support and you'll need to use modded drivers.
The no.1 issue with running Windows 7 on a AMD Ryzen system is that Windows 7 lacks the necessary drivers for USB ports which makes configuring such a system problematic.
History
25 May2020: Article updated.
Driver downloads
For 1st and 2nd gen Ryzen and up to X470 motherboards download the latest chipset drivers for Windows 7 from here.
For 3rd gen Ryzen (aka Zen2) CPUs and X570 and possibly B550 motherboards you need to download modded drivers by canonkong from here. You could also mod the drivers yourself by following this guide. Previous discussions about this method have taken place on this reddit page.
Installing the modded drivers on an existing Windows installation
In order to install the drivers on an existing Windows 7 installation, ideally you should have a mouse connected to the have PS/2 port and use Windows On Screen Display (Start->Programs->Programs->Accessories->Accessibility) for typing. Or you could have a USB PCIe card that already has working drivers. If you have a working LAN, another way would be to remotely connect to this AMD Ryzen PC you want to install the drivers.
For those devices that do not have drivers installed, to install their drivers right-click on Computer-> Manage-> Device Manager and go through each device that does not have a driver and right click "Update Driver Software..."-> Browse my computer for driver software-> select path where the drivers where extracted.
Integrating the drivers on the Windows 7 installation image
To add the USB drivers and any other drivers to the Windows 7 installation image (DVD/USB flash drive) you can slipstream them with tools like ntlite or Windows 7 Image Updater.
Disabling Secure Boot would be required for example in order to enable Test Mode for Windows if you received the "The value is protected by Secure Boot policy" error, in some cases if you want to install a specific Linux OS or if you want to install Windows 7. The exact location and procedure to enable or disable Secure Boot can vary depending on BIOS version and motherboard generation.
Reboot system and press Del repeatedly at system start. Some OEM PC(HP, Dell, Acer, Lenovo, Toshiba etc.) and notebooks use keys like F1, F2, F8, F10 or F12 for entering BIOS.
If that does not work, go in Windows, hold the "Shift" key and select Restart from the Start Menu. After restart, the Advanced Startup menu options will appear. Go to Troubleshoot > Advanced options > UEFI Firmware Settings and press Restart.
Look for "Secure Boot" option under under Boot, Security or Authentication menu categories.
Set "Secure Boot" to Disabled.
Save and exit.
Enable Secure Boot
Enter the BIOS.
Look for "Secure Boot" option under under Boot, Security or Authentication menu categories.
Set "Secure Boot" to Enabled.
Save and exit.
ASRock motherboards
Disable Secure Boot
Enter the BIOS:
Reboot system and press Del repeatedly at system start.
If that does not work, go in Windows, hold the "Shift" key and select Restart from the Start Menu. After restart, the Advanced Startup menu options will appear. Go to Troubleshoot > Advanced options > UEFI Firmware Settings and press Restart.
Switch to "Advanced Mode" if the BIOS is in "Easy Mode".
Go to Security-> set "Secure Boot" to Disabled.
Save and exit.
Enable Secure Boot
Enter the BIOS.
Switch to "Advanced Mode" if the BIOS is in "Easy Mode".
Go to Boot->CSM(Compatibility Support Module)-> set CSM to Disabled. If you haven't had this enabled before, your OS will not boot if your disk partition style is MBR and not GPT.
Save and exit.
Enter BIOS.
Go to Security and set "Secure Boot" to Enabled.
Save and exit.
ASUS motherboards
Disable Secure Boot
Enter the BIOS:
Reboot system and press Del repeatedly at system start.
If that does not work, go in Windows, hold the "Shift" key and select Restart from the Start Menu. After restart, the Advanced Startup menu options will appear. Go to Troubleshoot > Advanced options > UEFI Firmware Settings and press Restart.
Switch to "Advanced Mode" if the BIOS is in "Easy Mode".
Go to Boot > Secure Boot > Key Management-> Clear Secure Boot keys-> Yes.
Go to Boot > Secure Boot > it should show that Secure Boot is disabled.
Save and exit.
Enable Secure Boot
Enter the BIOS.
Switch to "Advanced Mode" if the BIOS is in "Easy Mode".
Go to Boot-> CSM(Compatibility Support Module)-> set "Launch CSM" to Disabled. If you haven't had this enabled before, your OS will not boot if your disk partition style is MBR and not GPT.
Save and exit.
Enter BIOS.
Go to Boot > Secure Boot > Key Management-> "Restore DB Defaults".
Go to Boot > Secure Boot > it should show that Secure Boot is enabled.
Save and exit.
BIOSTAR motherboards
Disable Secure Boot
Enter the BIOS:
Reboot system and press Del repeatedly at system start.
If that does not work, go in Windows, hold the "Shift" key and select Restart from the Start Menu. After restart, the Advanced Startup menu options will appear. Go to Troubleshoot > Advanced options > UEFI Firmware Settings and press Restart.
Go to Security ->Secure Boot-> Set "Secure Boot" to Disabled.
Save and exit.
Enable Secure Boot
Enter the BIOS.
Go to Advanced-> CSM Configuration-> Set "CSM Support" to Disabled. If you haven't had this enabled before, your OS will not boot if your disk partition style is MBR and not GPT.
Save and exit.
Enter BIOS.
Go to Security ->Secure Boot-> Set "Secure Boot" to Enabled.
Save and exit.
Gigabyte motherboards
Disable Secure Boot
Enter the BIOS:
Reboot system and press Del repeatedly at system start.
If that does not work, go in Windows, hold the "Shift" key and select Restart from the Start Menu. After restart, the Advanced Startup menu options will appear. Go to Troubleshoot > Advanced options > UEFI Firmware Settings and press Restart.
Switch to "Advanced Mode" if the BIOS is in "Easy Mode".
Go to Boot and set "Secure Boot" to Disabled.
Save and exit.
Enable Secure Boot
Enter the BIOS.
Switch to "Advanced Mode" if the BIOS is in "Easy Mode".
Go to Boot and set "CSM Support" to Disabled. If you haven't had this enabled before, your OS will not boot if your disk partition style is MBR and not GPT.
Save and exit.
Enter BIOS.
Go to Boot and set "Secure Boot" to Enabled.
MSI motherboards
Disable Secure Boot
Enter the BIOS:
Reboot system and press Del repeatedly at system start.
If that does not work, go in Windows, hold the "Shift" key and select Restart from the Start Menu. After restart, the Advanced Startup menu options will appear. Go to Troubleshoot > Advanced options > UEFI Firmware Settings and press Restart.
Switch to "Advanced Mode" if the BIOS is in "Easy Mode".
Go to "Advanced"-> "Settings"-> "Windows OS Configuration"->Secure Boot-> set "Secure Boot" to Disabled.
Save and exit.
Enable Secure Boot
Enter the BIOS.
Switch to "Advanced Mode" if the BIOS is in "Easy Mode".
If you want to enable Secure Boot: "Advanced"-> "Settings"-> "Windows OS Configuration"-> look for "Windows 8/8.1 Feature" or "Windows 10 WHQL Support" and set it to "UEFI". If you haven't had this set to "UEFI" before, your OS will not boot if your disk partition style is MBR and not GPT.
Save and exit.
Enter BIOS.
Go to "Advanced"-> "Settings"-> "Windows OS Configuration"->Secure Boot-> set "Secure Boot" to Enabled.
Save and exit.
Acer PCs and notebooks
Disable Secure Boot
Enter the BIOS:
Reboot system and press Del repeatedly at system start.
If that does not work, go in Windows, hold the "Shift" key and select Restart from the Start Menu. After restart, the Advanced Startup menu options will appear. Go to Troubleshoot > Advanced options > UEFI Firmware Settings and press Restart.
Go to Boot section, set "Secure Boot" to Disabled.
If the option is not there look under Authentication section-> Set "Secure Boot" to Disabled.
Save and exit.
Enable Secure Boot
Enter BIOS.
Go to Boot section, set "Boot Mode" to UEFI. If you haven't had this enabled before, your OS will not boot if your disk partition style is MBR and not GPT.
Save and exit.
Enter BIOS.
Go to Boot section, set "Secure Boot" to Enabled.
If the option is not there look under Authentication section-> Set "Secure Boot" to Enabled.
Save and exit.
Useful for the following OS:
Windows 8, Windows 8.1, Windows 10, Windows Server 2012, Windows Server 2016, Windows Server 2019
If you have hissing, buzzing or crackling noises coming from the speakers or headphones or if people you talk to using the microphone complain that they hear buzzing noises coming from your end, you could try the following solutions to solve this:
If you are using the case front panel connection then try connecting the speaker system, headphones, or microphone directly to the card. If the issue is resolved and you still want to use the front panel connection read this (archive.org).
Connect your PC to a grounded electric outlet. If the connection to the ground works properly, you will not feel any current when touching and moving your fingers on the metal parts of your PC case.
The problem might be from too much EMI (Electromagnetic interference):
Move the sound card farther away from the GPU.
Make an EMI shield for your sound card (#1, #2). If you care about esthetics you can do something like this, but first make sure it works with the aluminum sheet.
Especially if the noises are caused when the video card is in use, undervolt the video card:
For Nvidia cards check this guide. You can also try this in conjunction with slightly lowering the clocks and/or the Power Limit.
For AMD Radeon cards I recommend you use MSI Afterburner and offset negatively the voltage by as much as possible. You can also try this in conjunction with slightly lowering the clocks and or the Power Limit.
You can find noise isolators that you connect to the sound card analog output but I won't recommend these as they might lower the sound quality (#1, #2).
For microphone buzzing, you could try connecting to the onboard cards microphone input if you have a dedicated sound card and use its microphone input.
If none of these work your only option would be to go with an external audio card or DAC or use the S/PDIF audio output if you have a receiver or speakers that have S/PDIF input.